
MoTR Production Update: Week 7
- 1rregularcharlie

- Apr 29
- 13 min read
AHOY SAILORS!
I'm VERY excited to tell you about the progess we've made over the last week!
A lot of what progress was made on is very technical and not very visually interesting. Never the less it is a vital part of the process and thus I really want to document it. For posterity if nothing else.
I'll be adding gifs for fun and flare. ;D
Current Status
General:
So I'm really happy to say we've been doing a bunch of tests and have resolved the main issues I discussed last week.
Some more tests needed to be done but I'm very confident we're on track and the path ahead is clear.
Small image updates:
Thursday to Friday last week was rather slow so I took some much needed down time to do little updates to images found on this website and the design guide. Also spent time reviewing the work completed thus far.
Anyway, the most visually interesting part of that is the updated cover image you can see on the homepage of this very website:

As you can see the designs of all the characters have been updated to better reflect their updated model sheets. For me it's nice to compare this to the version and note the personal progress I've made in my artistic abilities and the style of the series. :)
Storyboard Pro to Blender:
So, this was the main crux of the issue I noted last week.
Honestly I should have noticed it before now but, I won't lie, we're learning as we go.
Getting to this point:
So I had hoped at the start of this that I could simply use Storyboard Pro and ToonBoom in conjunction with each other throughout the entire production. Both these programs are made by the same company (ToonBoom) and thus interact with each other well. Plus I've been using ToonBoom almost exclusively for years so I'm very well aquainted with it. If our series was purely 2D I believe this would have worked perfectly as both programs are very robust with a great variety of effects and tools that can be exported and imported from one program to another. BUT as you well know however, our series is not purely 2D.
The decision was made during the boarding process (half a year ago now, damn) that the series would move from a purely 2D production to one featuring 2D Characters in a 3D enviroment. This decision was primarily made because of my frustrations at drawing backgrounds and the fact I'd loose track of where the characters were within a scene. Thus I contacted Katherine Vickers (who I had met at Annecy 2025). I commissioned her to create the 3D model ship. She very quickly mocked up a very rough 3D model of the ship that I went on to use throughout the boarding process. I quickly fell in love with being able to move the camera around a 3D enviroment and really enjoyed knowing where the boardries and walls of an enviroment were, which allowed me to have fun having the characters interacting with them. An example you will see in the future is prolonged chase sequence in Episode 1 where the camera follows Hawkins ducking, weaving and climbing over EVERYTHING.
Thus I asked Katherine if she'd like to continue helping with the project and essentially become one of the earliest members of the core team. Keeping in mind her busy university schedule and part-time job. She passionately agreed which was very uplifting. :D
Anyway, 3/4 of a year later, all the boards for 3 animated shorts (designed for youtube, instagram and tiktok) and a single 10 minute long episode were completed.
It was only at this point I realised that ToonBoom wouldn't be able to do the additional compositing and lighting this series needed and the best program to do that would be Blender. Toonboom CAN import 3D models and objects but it's definitely designed as 2D animation program first. Frankly it's my favourite 2D animation program, so not complaining.
With that said, we began the tests...
Transferring from Storyboard Pro to Blender:
I won't lie, this is the part I was worried about the most. There was and is frightfully little in the way of tutorials or help in transferring from Storyboard Pro to Blender. Never the less I came to realise that Storyboard Pro could export in a .FBX format, which could be imported into Blender.
The issue is that I was unsure how accurate that import would be.
There were several points I was particually worried about.
Camera movements. As mentioned above, I extensively used the camera throughout the boarding process to create the shots and transitions I wanted. If I couldn't import that data accurately into Blender from Storyboard Pro it was going to cause serious issues and might lead us to having the RECREATE shots and scenes in blender from scratch. Which would obviously be a disheartening and loooooong process.
The panels. If the drawings and, potentially more importantly, there placements in the 3D enviroment couldn't be accurately imported this would again put us back. As we'd have to go through and recreate those drawings and placements within Blender or go through the long process of exporting the panels as images from Storyboard Pro and individually importing them into Blender and placing them correctly within the shot. Not impossible but very frustrating and monotinous.
Our first tests were worrying as my version of Blender seemingly wouldn't import the .FBX files or even install plugins.
Then I realised I was still using Blender 2.9 from 2019. You know... like an idiot.
So I went and downloaded the latest version and, hey presto, it worked a charm.
The .FBX files from Storyboard Pro COULD be imported into Blender and largely retained the correct infomation, though not without small issues.
The Issues:
The first issue was related to the imported camera. Whilst the camera was generally in the correct position it had the wrong resolution and seemed to be bizarrely smaller then the camera in Storyboard Pro. It also imported with only the first and last keyframes of the camera and none of the inbetween keyframes. So if the camera moved within the sequence, it didn't retain that infomation in the import. This is obviously a BIG problem as there are sequences and shots int he series that rely heavily on camera movement and timing.
The second issue was related to the imported images. Whilst the images imported with the correct drawings and in the right place spacially, they didn't disappear. Every image was overlayed on top of one another as a seperate panel/layer. This included that layers I had set to invisible in Storyboard Pro. They did however retain their keyframes unlike the camera (no idea why).

The Solutions:
The solution we've struck upon for the camera issue isn't perfect, but it works for the moment. Firstly we realised that Storyboard Pro has a very helpfull feature available whilst exporting. It can create a camera frame, which is a layer that shows the size and position of the camera throughout a sequence. Thus we had something to guide us in Blender.
The issue with resolution could be edited within Blender and simply required flipping the X and Y of the camera to turn the camera in the vertical format needed for shorts.

A picture displaying the resolution settings within Blender. The other issue was with the camera being bizarrely smaller than the camera in Storyboard Pro. After double checking that the camera hadn't been moved closer during the import I realised that the default Focal Point in Blender was different to the camera in Storyboard Pro. This was an issue I hadn't expected because the camera in Storyboard Pro (as far as I know) doesn't have a focal point setting. Thus I couldn't check it in Storyboard Pro and copy that infomation over to Blender. Looking online didn't result in any answers so I took a shot in the dark. I simply halved the default camera focal point in Blender and that seemed to just about fit the guide provided by the camera frame.

A picture showing the Focal Length settings within Blender. The last issue in regards to the camera is that whilst the import remembers the location of the camera, it doesn't remember the keyframes between the first and last frame. This will cause headaches in the future. However with the camera frame layer showing where the camera was at certain points, it's not impossible to simply recreate the camera movements. As frustrating as that's going to be, it works. Though that does bring up the issue of timings. Luckily, and strangely, whilst the keyframes for the camera didn't import between the first and last frame it did add those keyframes to another layer. In our case it was the bottom layer, the layer with the 3D model of the ship. These keyframes didn't change anything, as they were just keyframes with the same infomation as the previous, but they did show us the timings for the camera. Thus in combination with the camera frame we can pretty accurately recreate the camera movements and timings within Blender.

A picture of a Dope Sheet with keypoints for a camera within a Blender file. I'm currently unsure if that will always be the case but, if worse comes to worse, we can import the .MOV files of the animatic and simply match the timings that way. It's not perfect. But it could have been A LOT worse.
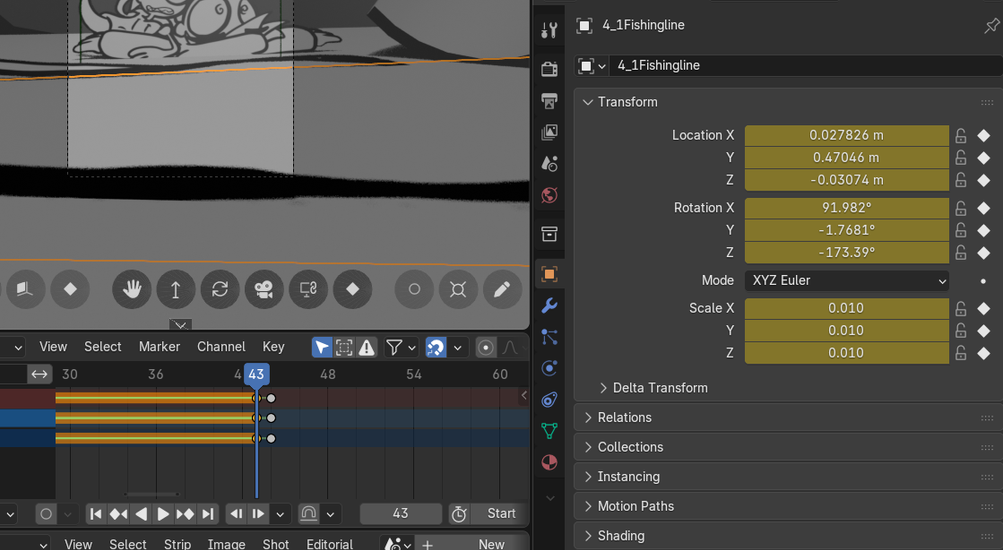
Spongebob phew. The solution in regards to the drawings was a much simpler fix, though more labour intensive. All the drawings had imported correctly and in the correct positions, retaining their keyframes. But the every drawing was it's own layer/plane and they didn't disappear, simply rested on top of one another throughout the entire sequence. The solution, again, isn't perfect but works for the moment. I went back through the Storyboard Pro files, renaming layers and deleting invisible layers. Whilst it's become standard practice for me to name my layers, by what that layer contains or is used for, I did not name them based on where in a sequence they came. So I went through every layer and added The Shot # - The Drawing #. So for example a layer that had the 5th drawing of Hawkins on shot 4 would be: 4-5Hawkins. Thus when I imported that shot into Blender, the planes were ordered correctly in the collection.

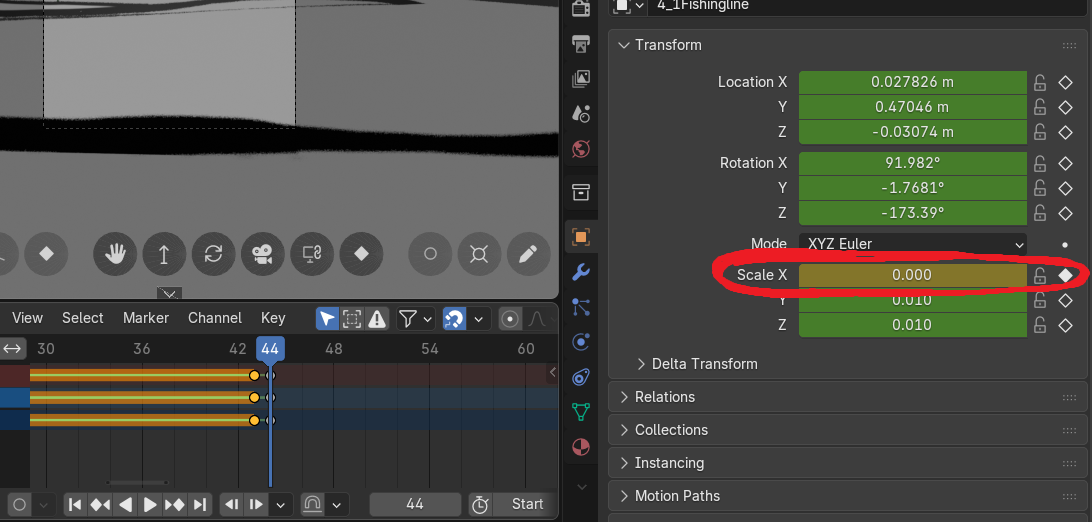
A picture displaying the planes with the new naming convention that means all the planes are properly ordered. I also keypointed the first and last frame of that drawing as I knew the keyframes on the drawing layers DO import correctly. Having done that I re-exported that sequence as a .FBX file and imported it into Blender. Now I could see which panel came where in the sequence and it's timing. I searched around to try find a solutioon to make a panel disappear in Blender at a certain point but the simple solution was to simply reduce it's scale to 0 a single frame after it's last keypoint on The Dope Sheet in Blender. Thus they effectly disappeared at the correct time and in the correct order.
Honestly the most important aspect of the drawings was that they import in the correct position spacially. As it means when we import the full animation of the characters we can simply copy the keypoint data from the animatic drawing on to the plane with the animation and it should just snap to the right position. We're testing this as I type this.


Thus we have effectively recreated the animatic made in Storyboard Pro in Blender.
Mission Accomplished!
The Question of Animation:
With the import issues from Storyboard Pro to Blender effectively dealt with (for now) the question became how to actually go about ANIMATING this animated series.
I mentioned in the last update but this is very new grounds for me. I've only ever worked in 2D before this, even my work with Mouse: PI for Hire was 2D. That said the game is a lovely mix of 2D Animations and 3D Enviroments made by the team over at FUMI (check it out if you haven't, I promise you it's a great game). ;D
Luckily, unlike importing from Storyboard Pro to Blender, there is a mountain of tutorials on how to mix 2D animation and 3D enviroments in Blender.
During our Monday meeting myself, Natka and Katherine puzzeled out how we were going to go about this. We realised that we'd have to isolate the drawings from the animatics of the characters without being affected by the camera, but only on shots where the camera MOVES in the 3D enviroment.
For example:
Both these shots are from the 2nd Short. Enjoy a sneak peak of basically nothing. ;D


The first shot is a still shot. The camera does not move from the position it has at the start, throughout the entire shot.
The second shot, as you can see from the Camera Frame, features a zoom out.
What this means is that we DO NOT need to isolate the characters in the first shot. As we can simply import the animatic to our animation program and effectively draw over the top. With possible consideration to layering the characters in the shots that need that... I'll get to that.
Counter to that, we DO have to isolate the characters and props in the second shot as the camera moves. Because of that camera movement if we simply imported the animatic to an animation program and draw over the top, we'd have to compensate for the camera movement or feel compelled to animate that zoom out into the character animation. The issue is that because we'll be importing these animations to Blender, the camera in the 3D enviroment will create that effect. Thus we'd essentially creating double zooms and it would be super off. The characters would zoom out and the camera would too. Not what we're looking for.
Thus I created a version of the shots that use camera movement and sperated out the characters and props from that camera movement.
As an example, this is the animatic panels of Hawkins and Carbo from the 2nd shot without the camera zoom out.
This would become the base that would lead us into, finally, begining rough animation.
The Rough Animation begins:
You read that right. We're finally onto doing rough animation!
You have no idea the thrill I get watching our characters move and talk. :DDD
We're focusing currently on doing a test shot that utilises the camera. We've settled on doing the rough animation for the 2nd shot you can see above (with the zoom out). This test will inform the creation of The Animation Guide and teach us the method by which to import the sequence into the Blender scene (though I do have a pretty good idea of how to do so already).
I've only just started animating Hawkins and Carbo for this shot but I'm already loving it. Hopefully next week I'll be able to show you guys the full thing, but for the moment enjoy the first bit of TRUE animation for Member of The Revelry:
Future Things
Layering:
As you can see in this shot;

Both Hawkins and Carbo are sitting on the edge of the ship. Their fishing lines and Hawkins legs are infront of them in relation to the camera.
Now in purely 2D or 3D this wouldn't be an issue. In 2D, you're in a 2D enviroment so you'd simply draw your characters as you want them onto that enviroment. In a pure 3D animation you'd just position and pose your 3D characters appropriately in that enviroment.
But we're doing 2D Characters in a 3D enviroment. Which means, regardless of what it may look like, our characters are flat planes in a 3D setting. Essentially peices of paper magically held up vertically, facing the camera.
Because of that, to have a 2D character sitting, with part of their body BEHIND a 3D object and another part INFRONT of that same 3D object we have to create seperate planes and animations and place them correctly in the enviroment to give the illusion of a single 2D character. In short, the animation looks really off if the camera moves. Luckily the shot above is a still sequence where the camera doesn't move. Thus if it looks good in camera, we're gravey.

We'll be working on this shot after we complete the rough animation and import test for the shot after this.
My concern is that this might become very labour intensive in the future with more complex shots. But I'm choosing to see it as a challenge to over come. At the end of the day, it can look as jank as it needs to outside of what the camera sees.
Gonna become a master of paralax panning. >:D
The Pipeline:
I mentioned this in the last post but having an efficient pipeline is essential to every animation production.
Because we're learning as we go the current pipeline looks like this (not including the final video editing program we're gonna use to put everything together):

As you can see we're jumping between quite a few programs, some of which are very expensive and don't always work well together.
During the process of teaching myself how to navigate Blender I discovered that it's possible to do storyboarding within Blender itself. I was not aware of this 3/4 of a year ago.
Blender is free. Storyboard Pro is not.
Katherine is using Blender to make the models, meaning that her files will be easier to transfer and import into the scene my end.
We're intending to import the animations into Blender. Having the planes already set up in Blender from the storyboards/animatic would make this process much easier.
Blender is the programm we'll be using to do compositing.
Blender is the program we'll be using to render the shots. We'll then essemble those shots in a video editing program.
Blender plays nicer with other programs as it's open source.
So it occurs to me that we can both save money and simplify production by making our storyboards, in the future, in Blender. It's not something I can impliment straight away (as the boards for 3 shorts and episode 1 have already been completed) and I will need to test out this feature further but when we get to boarding for more shorts and Episode 2 my hope is that we can switch to this pipeline:

The Coming Week
1rregularCharlie:
So for the coming week I've got quite few things I need to test and get cracking on.
I need to completed the rough animation above and import that into Blender. If all goes to plan that'll lead onto 2. and 3.
I need to begin the Animation Guide with insights gleaned from the rough animation work being done for the import test.
If I complete the rough animation for the current shot before next Wednesday I need to begin rough animation for the shot of Hawkins and Carbo fishing off the edge of the ship. Which will allow me to puzzel out how we'll be doing layering in the future.
Natka:
Natka is enjoying a week off from an intense period of work with FUMI with the release of their first game.
With that said she'll hopefully be finding some time and energy to have a crack at doing some test character animations.
Katherine:
Katherine is still wading through the nightmare that is writing essays and completing univeristy projects. With that said she's raring to go on doing further work on the ship and is looking forward to having enough free time to get back into it.

Comments